
Up today is a customer's SX-1280, AK member suitekids. This receiver is one of his babies and he asked me to give it the best, so here are the results!
This 1280 has been serviced before, the previous tech did a dubious mod to the protection circuit which I'll be showing here a little later. We'll start with the preamp boards.

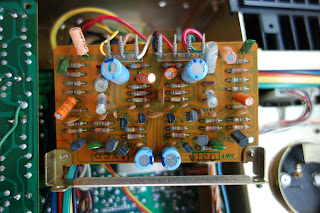
First up, the flat amp board, a 2 stage DC circuit employing a FET input stage for higher input impedance. It also utilizes NFB for a lower output impedance.

And after. 10 caps and 2 transistors were replaced. Panasonic FM and ECW poly caps were used here. The 4.7uF input caps were replaced with a polypropylene as space allowed it. Transistor replacements are low noise Fairchild equivalents.

Here are some photos showing how much the original input caps have deteriorated.
At 120Hz:

At 1KHz:

Way out of tolerance and high loss as well. A near perfect cap's loss tangent should be around -90°.
Moving on, we have the tone amp board. This is also a 2 stage NFB circuit.

And after. This board has a lot of parts that are replaced, 36 caps and 4 transistors were replaced here. Replacements are Nichicon KL for the orange low noise caps and tantalums, Rifa and Wima polypropylenes for the caps under 1uF and Panasonic FM for everything else. Transistor replacements are low noise Fairchild equivalents.

Next, we have the function board.

And after. Just two caps to replace here, using Panasonic FM and FC here:

Now, we have the filter amp board. A couple caps have been replaced already on here, though they are not the ideal replacements.

And after! 8 caps and 2 transistors were replaced, Nichicon KL for the caps above 1uF and Wima polypropylene for the caps under 1uF. Transistor replacements are low noise Fairchild equivalents.

The meter amp board is sometimes overlooked, but it does have a few caps that need replaced.

And after! Nichicon PW caps were used here.

Next, the phono amp. This is the last board on the bottom of the receiver that needs to be done.
And after! 14 caps and 10 transistors were replaced, Panasonic FM used for the blue filters, Nichicon KL for the orange low noise caps and Nichicon ES were used for the 4.7uF output bipolar caps. The mylar films were replaced with Panasonic ECQ and Wima FKP caps.


And after! 14 caps and 10 transistors were replaced, Panasonic FM used for the blue filters, Nichicon KL for the orange low noise caps and Nichicon ES were used for the 4.7uF output bipolar caps. The mylar films were replaced with Panasonic ECQ and Wima FKP caps.

Moving on to the power amp boards, here is the right power amp board:

An unpleasant surprise greeted me when I flipped the board over, the previous tech destroyed part of a trace leading to the DC-offset adjustment pot when they replaced it, and the jumper they put in is a little remiss. Not hard to repair thankfully.

I bypassed the broken trace completely and soldered some small gauge solid core wire to a solder joint further up the trace. Makes for a much cleaner look.

The 2SA979 dual transistor I replaced with a 1% beta matched pair of KSA992 transistors
put face to face and heatshrinked together for better thermal tracking and stability. I've found that the 979
tends to become leaky, causing the offset to jump around a lot and make
it hard to dial in, even with a multi-turn pot. The 1uF input cap was
also upgraded with a Panasonic polypropylene.

And after! 9 caps, 3 transistors and both trim pots were replaced. The molex pins were also cleaned to a nice shiny surface.

The left amp board before:

And after! Same as the right amp board, except this one didn't need any traces repaired!

Big one here, the regulated power supply board. This was already recapped by the previous tech, however the cap replacements used were less than ideal and most of the them were not low impedance. Amazingly the soft start relay was replaced with the proper Omron replacement.

While I was replacing the relay (just so everything is new), I noticed this. That is pin 1, which is the 120V AC in to the soft start circuit. This thing did work when I got it, so it must have been just barely hanging on and me moving the board to get to the back broke it loose.

Much better!

And after! 16 caps, 7 transistors, 7 diodes and the relay were replaced. An extra heatsink was added to Q5 as well. Nichicon PW along with Nichicon TVX caps were used here. Diodes and transistors were all On-Semi/Fairchild, with several transistors getting upgraded to a TO-92L case style for better heat dissipation and longer life.

Up now is the protection board. One of the concerns brought up by suitekids when he sent this to me was the fact that there was no protection delay at all and would thump his speakers pretty hard. Anybody see what's wrong in this photo?

This is a good mod, right? I mean, it allows the relay to engage, so it's obviously a good thing! 😒

And after, looks a lot better! The protection relay was replaced with the proper replacement, but for the sake of everything being new I replaced it again. 6 caps, 2 transistors and the relay were replaced, Nichicon PW was used here and relay driver was upgraded to a TO-126 case style for better heat dissipation and longer life.

And finally, the tuner board.

And after! 26 caps were replaced, Nichicon KL were used for the low noise and tantalum caps above 1uF, Wima and Kemet stacked film polys used for caps under 1uF and Panasonic FM and FC for everything else. The tuning capacitor was also cleaned.

Filter caps were also replaced and upgraded. Before:


And after! Filter caps were upgraded from 15000uF to 22000uF, this is safe to do as the 1280 has a soft start circuit. I also cleaned and polished the chassis and transformer, came out pretty nice!


Fired her up, set the offset and bias to spec, let it play for an hour to settle everything in, then reset the offset and bias adjustments. Got a video of it playing, this thing sounds phenomenal!
And now some beauty shots! Protect anything damaged by drool, you have been warned! :-P


And that completes this restoration! Feel free to leave comments or questions. Up next will be a Pioneer SPEC-2, so stay tuned!
An
unpleasant surprise greeted me when I flipped the board over, the
previous tech destroyed part of a trace leading to the offset pot when
they replaced it, and the jumper they put in is a little remiss. Not too
difficult to solve, just annoying.
An
unpleasant surprise greeted me when I flipped the board over, the
previous tech destroyed part of a trace leading to the offset pot when
they replaced it, and the jumper they put in is a little remiss. Not too
difficult to solve, just annoying.
You sir are bad ass...
ReplyDeleteGreat rebuild!! I also have a SX 1280 that’s in need of a rebuild.
ReplyDeleteWhat a pleasure to read this post. Thank you.
ReplyDeletewhat does it cost to restore the pioneer SX1280?
DeleteWhat does it cost to restore the Pioneer SX1280?
ReplyDeleteMorning Matt...
ReplyDeleteJust checking your webpage out. Great work!!
Morris Belgard
I am in need of re of my Pioneer
ReplyDeleteSX 626 And my PL 51 Turntable. I have had both of these for near 50 years . I just don't want to let them go 😭.
Can you help me? As both are in excellent condition. My mom lives in Hamilton,I live in Indiana. I'm ready for road trip and resurface my mom's front deck she is 87 I'm 65. My name is Eric and I'm a real bonafide buckeye.
As far as the level of restoration goes I will have to leave it up to you as an expert. Again I'm 65 and hearing is not very good. I'm basically like to listen to the radio and play my old albums. The second level seems to be more for me but again you're the radio guy. I'm a millwright LOL
ReplyDeleteThanks
Bias setting: The schematic lists 70mA per channel. Because each channel has 2 output stages that would be each stage would see ideally 35mA. The emitter resistance is approx. 1 ohm across each stage. which would indicate approx. 35mV of bias across each stage.
ReplyDeleteThe service manual calls out 10-25mV of bias and to set to 15mV.
I suspect it can run distortion free at 15mV and it will also run cooler.
Do you set your bias at the 15mV or 35mV. The schematic does not seem to match the service manual procedure. Which I guess is not hard to believe.
Contacted you via email for possible refurb of my purchased new (1979) Pioneer SX-1280. Hopefully you can help! Thx!
ReplyDelete